 |
GT RoboCup SSL
Soccer software, robot firmware
|
 |
GT RoboCup SSL
Soccer software, robot firmware
|
Before starting, you'll need a Unix-like environment. This means you need to be running OSX or Ubuntu Linux (other flavors of Debian may work, but we do not officially support them or FedoraCore).
You'll also need a GitHub account, which you can create here. GitHub is a web front-end for a program called Git, which allows multiple people to work on and contribute to the same code base, at the same time.
Before you can begin work, you'll need to setup our RoboCup toolchain. You can run the script located in util/ubuntu-setup or which ever script applies to your operating system.
We use Git as our version control system (if you already know git, you can continue on to contributing guidelines here). A Version control system allows many people to code for the same project at the same time.
A "cheat-sheet" of Git commands can be found here.
To ease new contributors into Git, I'll repeatedly use the analogy of the classroom test.
If you simply want to learn about the workflow we use, and are less interested in learning the relationships between Git elements, you can skip to the "Overall Workflow" section.
If Git is like a test, then you can think of the master branch as the final copy you submit for grading. This copy should have the correct answer, should contain the most effective or efficient solution, and should be highly neat and readable for the graders. You probably shouldn't do any work here, but rather should explore in other locations such as scrap paper. Once you have several solutions, you can pick the one you like the best, and more neatly copy the work on to the test you will hand in.
Our master branch can be found here. The code in latest master is always neat and untouched. It can always compile. When you first clone our codebase from git to view the simulator and soccer, you are using the code in master. It is in all respects, the master copy from which all other contributions are derived. Even if you are eventually given permission to write to master, you should never do so.
If the professor puts test questions on the whiteboard for the whole class, you would not be allowed to solve the problems on the board; you would be expected to copy any relevant information to your own paper and solve the problems there. This gives you the freedom to play around with rephrasing and solving questions, without distuirbing others.
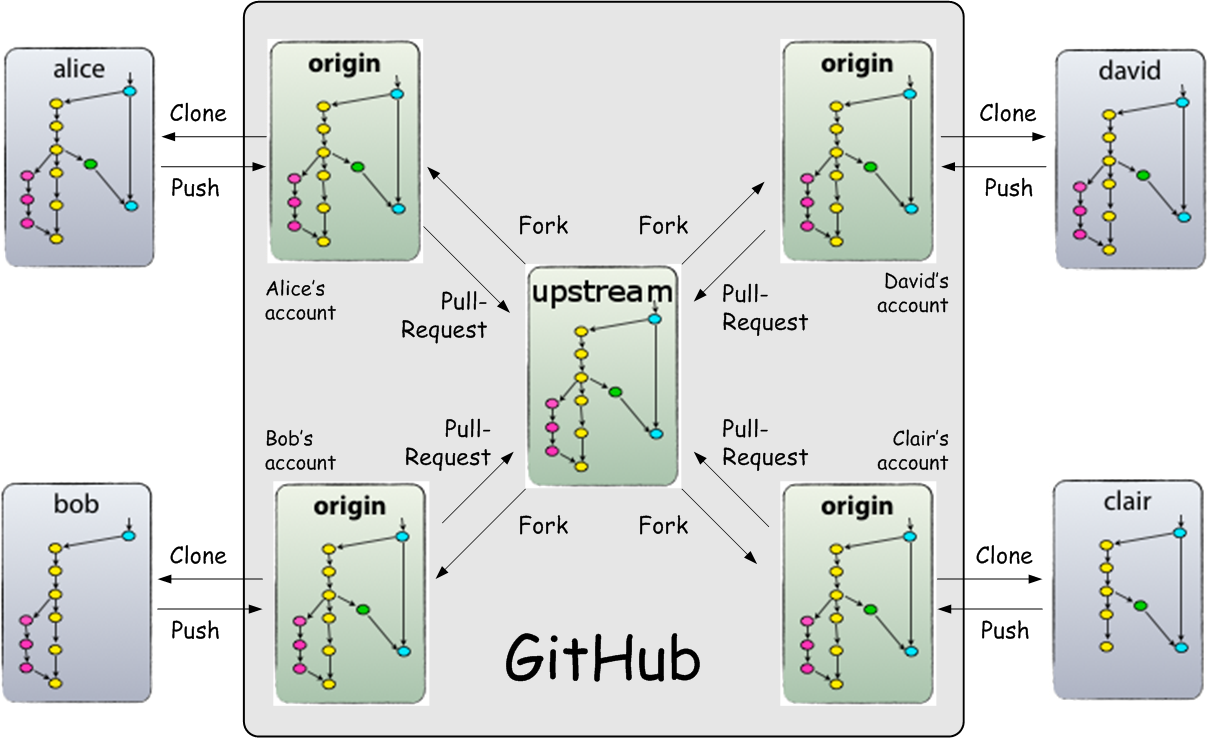
Forking a repository on GitHub duplicates the project, but you are given full write access to your own duplicate. Now you can delete, recreate, and add code relevent to your contribution without harming the progress of others. This duplicate is known as your repository and every team member has a fork. This is different from the main repository which belongs to the team rather than an individual. Don't confuse the main repository with the master branch. The shared, main repository can have incomplete features being worked on by everyone. The master in your fork and the master in the main repository should always remain clean.
This also works well when you want a feature that only some people want. You don't have to move every contribution from your fork back into the main repository. When you have contributed something and want it placed in master, whoever is reviewing your code will look at your fork of the code and compare it to the master branch.
Branches are like pieces of scrap paper. You can use them to organize your work and solutions to the test questions. You should not have work regarding different problems mixed across several pieces of paper; you may get your progress confused. You should use one (or several) peices of paper for each problem you are trying to solve, but should never use one sheet for multiple questions.
For RoboCup you should create a new branch for every new item you'd like to work on and for every bug or issue you have to fix. This ensures your master branch stays clean. You should never solve more than one issue at a time and you should never have changes or additions for multiple things in the same branch. You can look at a typical branching layout.

If Git is like a test, then remotes would be copying/collabortaion (cheating to some people). A remote allows you to view the solution(s) of another classmate, and pull those additions into your repostory as if they were on the classroom whiteboard.
In software this can be particularly useful if a team member is working on some new code that may not be perfect yet, but isn't ready to be folded into master. This may happen when you cannot continue work without getting the somewhat related progress from someone else. You should understand that when pulling from someone else, they take no responsibility for any problems their updates may cause for you. This is a decently advanced concept for those new to distributed environments, and won't be used too often. We encourage you learn more about this independently if interested.
If you read the previous sections, you may be a little overwhelmed. This section will describe how these elements interact to form a coherent workflow that will allow you to make contributions more easily. You can view an overall diagram of how data moves between team members and GitHub.

Ensure you have a fork of the main repository and that you've cloned it onto your desktop.
You now have a copy of your repository's master branch avaliable to you. When you have an idea of what you'd like to contribute, create a new branch before starting work. Assume you want to write some radio firmware, so you name your branch radioFirmware.
Your new branch contains a copy of the content of master. Make your additions and edits now, they will only affect the radioFirmware branch. When done add and commit the files.
You now have a branch with your contribution, but you haven't contributed until the code makes it into the main repository. This involves several steps. First, any changes others have made in the team's repository need to be merged into your code. If there are any conflics Git can't resolve automatically, it is your job to resolve those errors. By merging changes into your contribution, rather than the other way around, you ensure the act of bringing your code into the team's repository will go smoothly. This helps when another member of the team reviews your code as well.
Now that you have a merged branch, you should push the branch to your GitHub. From GitHub, you can make a pull request from your repository against the team's repository. This will notify an older team member that you are ready to have your contribution reviewed. Requirements for pull request standards are listed in several sections below. The older team member may ask that you fix or touch up some things before the request is accepted. This is normal and common. Once the pull request meets standards, the older member will approve it, and you changes will be complete.
Keep in mind, you can have several branches at once. If you need to fix a bug for an existing contribution while working on a new one, you should checkout the master branch, and then create a new branch named bug fix. It is critically important that a pull request only address one thing at a time. If it does not, the request will not accepted until you have separated the items you have worked on.
If you've done all this successfully, you are now an official contributor.
Here we will work through a very possible scenario that may arise while contributing to the project. At this point, you should have created a GitHub account and forked the main RoboCup repository. You should also look at creating a ssh key for GitHub here.
git checkout -b radioFirmware. You will automatically be switched to the new branch,git checkout master. Now create a new branch for the bug fix like so git checkout -b pathPlanningHotfix.git checkout radioFirmware. You can now (optionally) delete the pathPlanningHotfix branch once the pull request has been accepted.Don't panic! Git saves history every time you commit, and thus you should always be able to recover and progress you've made and undo mistakes affecting others. When in doubt consult this. Feel free to ask for help at any time, and always ask for help when attempting anything in the "DangerZone".
If you are interested in learning how to deal with more complex situations that may arise with Git the below are two highly recommended online sample projects to help you learn.
Learn git branching: https://learngitbranching.js.org/?locale=en_US
Git Game (Git error fixing): https://github.com/git-game/git-game-v2